- Published on
9 min read
Deploy Microservices with Docker ARG & ENV Variables on Heroku with GitHub Actions
- Authors
- Name
- Shariq Hirani
- @shariqhirani


- Heroku, Github Actions, and Docker ENV & ARG Variables
- Environment Variable Hierarchy
- Storing environment variables in GitHub Secrets
- Accessing Secrets with GitHub Actions and Docker Build ARGs
- Passing Secrets to Docker Containers From GitHub Actions
- Deploying to Heroku with GitHub Actions and Docker ENV and ARG Variables
- Conclusion
Heroku, Github Actions, and Docker ENV & ARG Variables
In cloud-native application development, secret management is always a hot topic. Many solutions exist for storing and retrieving data securely and lead to full-blown implementations of config servers, HashiCorp's Vault, and robust stash solutions.
For smaller applications and development environments, however, we can use simpler methods of storing and retrieving secrets as environment variables and inject them using our CI/CD pipelines. As continuous integration and continuous deployment have become more normalized for even sample applications thanks to tools like Vercel, GitLab CI/CD, and GitHub Actions, we can easily store and inject our environment variables within those tooling's secret management offerings as opposed to the expansive solutions we may be inclined towards.
This guide will cover creating secrets in GitHub Secrets, accessing them through GitHub Action's workflows, passing them to Docker using the ARG and ENV parameters, and having Heroku deploy the application. We'll use a NestJS project from a previous tutorial as a starting point for the rest of this guide. Note that the underlying language or framework you use shouldn't matter as long as you're using Heroku, Github Actions, and Docker to deploy your apps.
Environment Variable Hierarchy
In general, applications will all follow the same hierarchy for environment variables. If you're not careful, you will end up overwriting a variable. On the other hand, this can be used to effectively manage environments and allow plug-and-play development and production environments.
The lowest level hierarchy in our workflow will be Heroku. We see this as they set our PORT variable for us, which we can access through process.env.* for our NestJS application. The next level will be the host machine that the application is being run on. This will often be referred to as the host. In our case, this will be the Docker environment that we create using the Alpine operating system as seen in the Dockerfile (i.e. FROM node:16.8-alpine3.11). Docker will provide secrets and environment variables which we need to manually configure. The next level up will be any environment variables set within our Node application. These variables should be able to be source controlled with the rest of the application, and not contain any sensitive information - variables such as API endpoints and application names. Now, a short graph to demonstrate the above.
Heroku > Docker > Node
If you try to manually set the PORT variable in your Dockerfile or any .env file, you will overwrite the one set from Heroku and your application will not be able to communicate.
Storing environment variables in GitHub Secrets
Why not use Heroku's secret management?
An important aspect in cloud-native software development has been to keep applications as agnostic of the hosting platform as possible. As new technologies and companies are found, deployment practices will change and be more and more coupled to the technologies these companies have developed. Vercel is a great example of this - NextJS has created a robust framework with React as the underlying principle and then tied some of their best features to their own hosting solution (e.g. image optimization). In some cases like Vercel's, this can't be avoided, but with our API development, we'll aim to keep our applications as agnostic as possible.
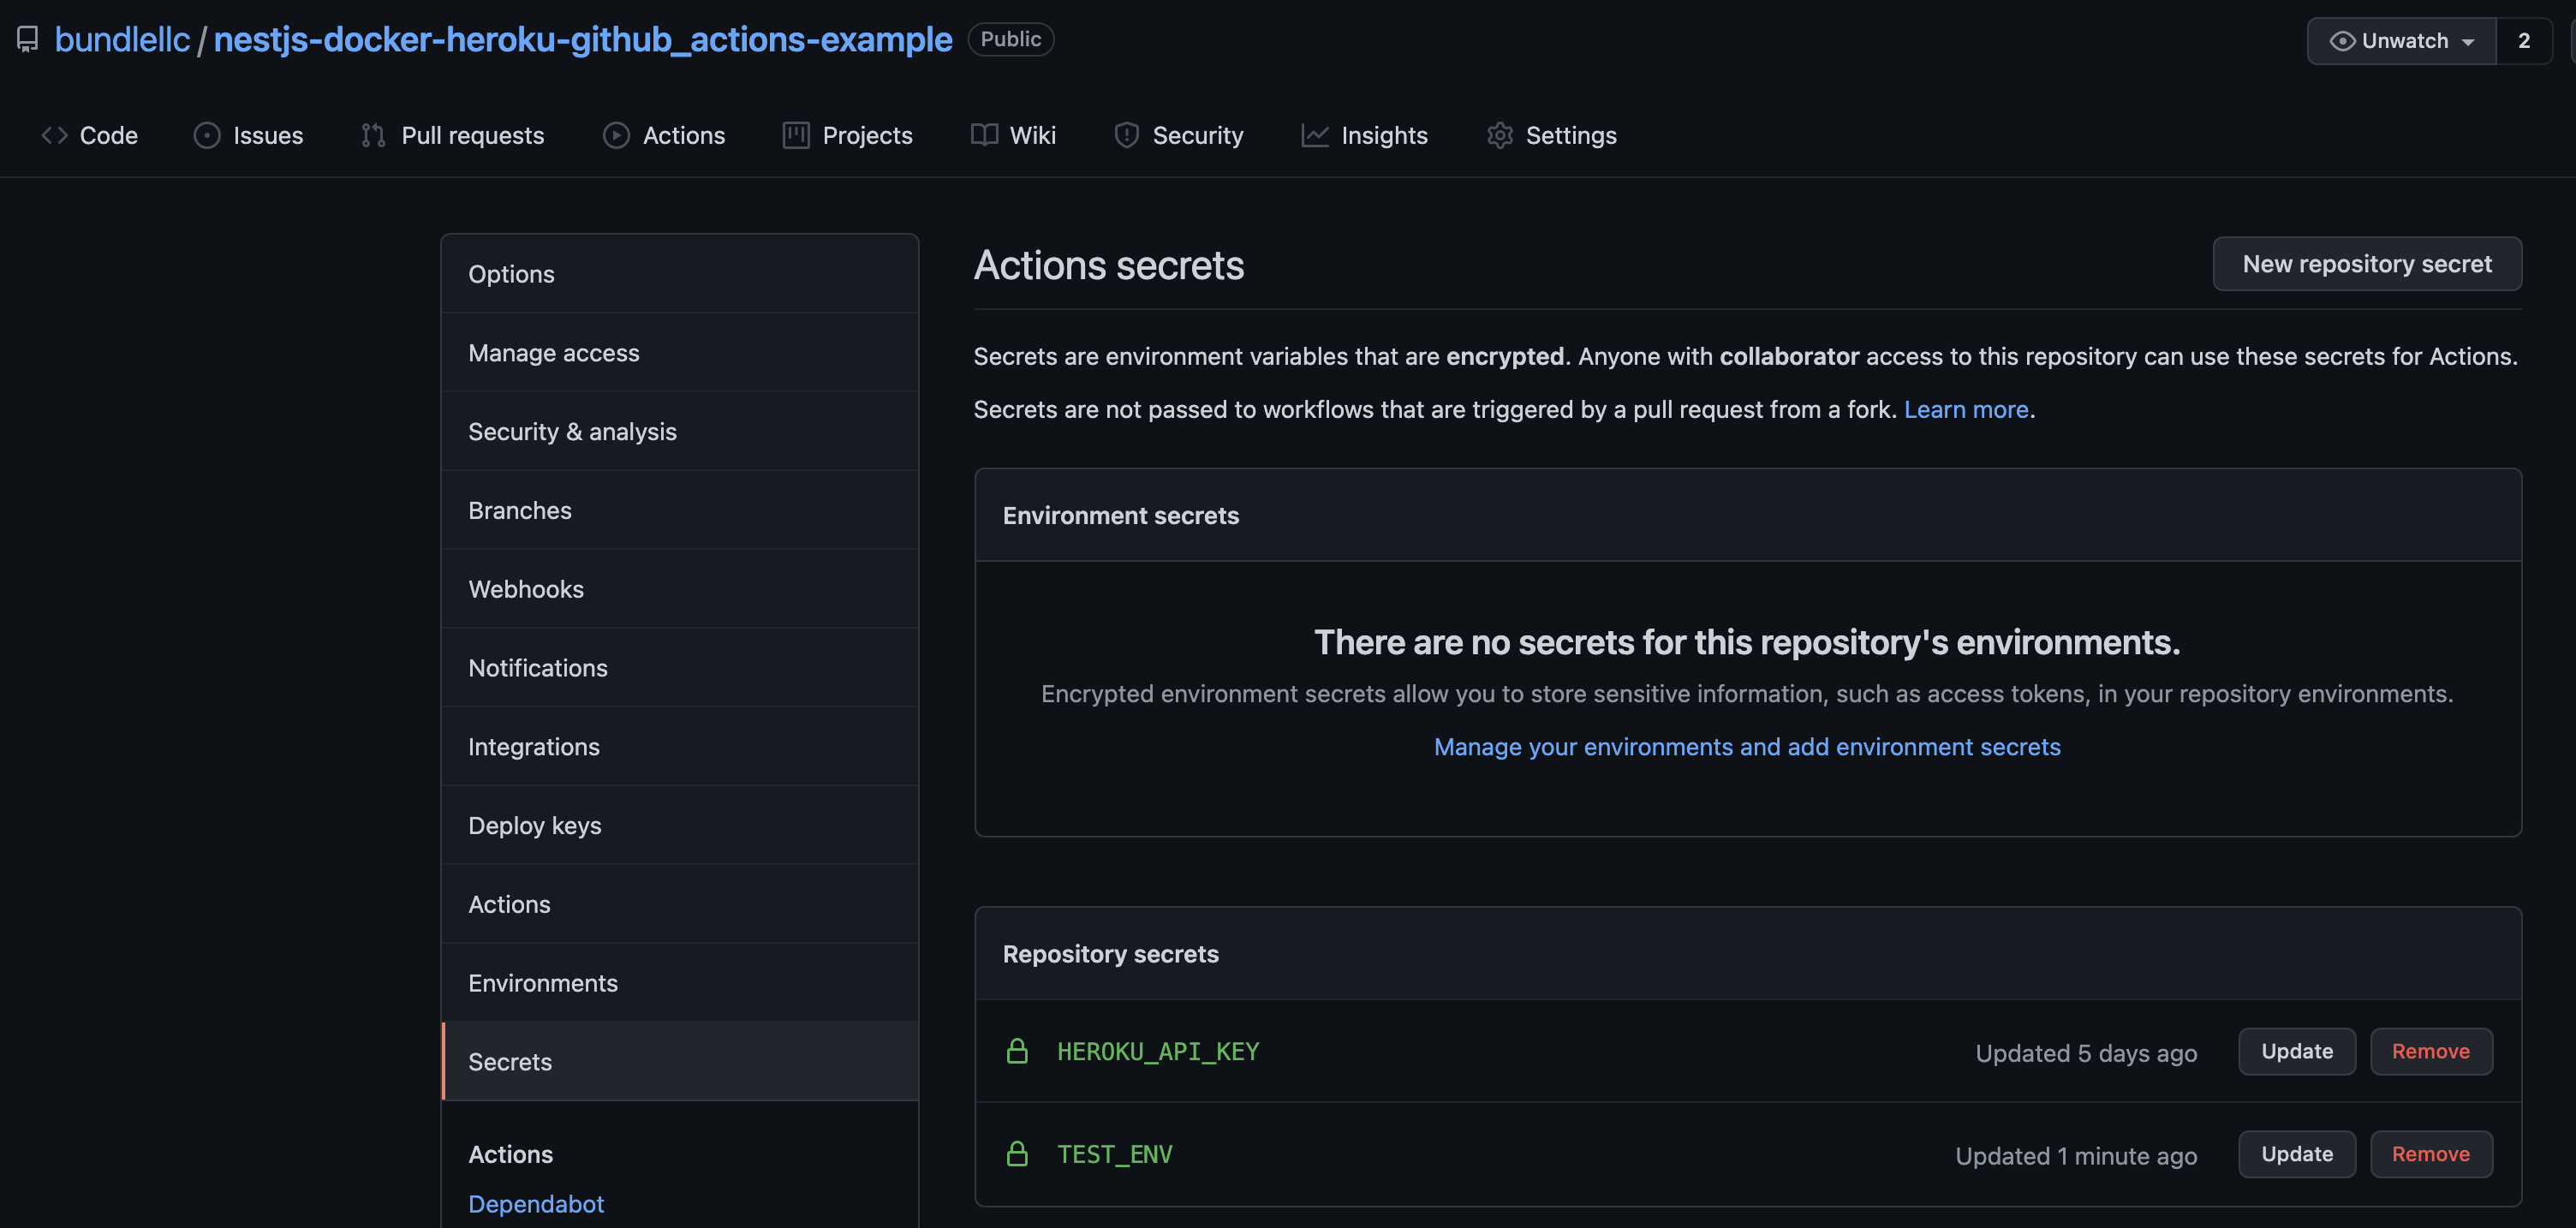
Create a new secret in GitHub Actions Secrets
Head to GitHub and then your repository secret settings to add a new repository secret. Press New repository secret to add your environment variable. Once completed, it should appear in the Repository secrets section. If you're following along from the last tutorial, you'll already have the HEROKU_API_KEY set. We're going to create a second secret called TEST_ENV as seen in the screenshot below. I set it to test_env_from_github.

Accessing Secrets with GitHub Actions and Docker Build ARGs
Now we will need to update our GitHub Actions workflow found at .github/workflows/main.yml.
name: Deploy
on:  push:    branches:      - example/env-vars
jobs: build: runs-on: ubuntu-latest steps: - uses: actions/checkout@v2 - uses: akhileshns/heroku-deploy@v3.12.12 # This is the action with: heroku_api_key: ${{secrets.HEROKU_API_KEY}} heroku_app_name: 'nestjs-docker-heroku-example' heroku_email: 'shariqhirani2010@gmail.com' usedocker: true docker_build_args: | TEST_ARG env: TEST_ARG: ${{secrets.TEST_ENV}}Note that even though we call the variable TEST_ENV, we're passing it to the GitHub Action as TEST_ARG. This
will be explained when we update the Dockerfile below where we discuss the differences between the
docker ENV and ARG variables.
A few changes were made from the original file.
on: push: branches:- example/env-vars determines the trigger for your GitHub Action. In this case, whenever a push or merge is made to the example/env-vars branch. Modify this to use your branch name.
docker_build_args: | TEST_ARG is used to pass in ARG variables to the Dockerfile during build time. Note that there is no way to directly pass in an ENV variable. This guide will help us get around that.
env: TEST_ARG: ${{secrets.TEST_ENV} sets GitHub Action's own environment variables so that they can be passed to your workflow. The Docker build ARG variables inherit their values from this section so the name must match the ARG name set above.
Passing Secrets to Docker Containers From GitHub Actions
We will have to update the Dockerfile to accept the ARG values and then set them to the ENV variables which we need for our application.
Update your Dockerfile.
FROM node:16.8-alpine3.11 as builder
ENV NODE_ENV build
WORKDIR /home/node
COPY . /home/node
RUN npm ci \    && npm run build \    && npm prune --production
# ---
FROM node:16.8-alpine3.11
ARG TEST_ARGENV TEST_ENV $TEST_ARG
ENV NODE_ENV production
USER nodeWORKDIR /home/node
COPY --from=builder /home/node/package*.json /home/node/COPY --from=builder /home/node/node_modules/ /home/node/node_modules/COPY --from=builder /home/node/dist/ /home/node/dist/
CMD ["node", "dist/main.js"]ARG TEST_ARG will set our Docker container's ARG variable
ENV TEST_ENV $TEST_ARG will set the Docker ENV variable to whatever the TEST_ARG is set to.
Docker ARG vs ENV
Setting the Docker ARG variable and then passing that value to the ENV variable seems redundant and it would be easiest to directly set the Docker ENV variable or permanently persist the ARG. However, this is not a capability we have.
Overall, the Docker ENV variable is meant to be accessed by running containers - this is important for variables that your application will need to constantly reference as it runs. On the other hand, the Docker ARG variable is meant to help build out your container.
Docker limits us from directly setting ENV during build time. However, we can set and modify ARG variables and have the Docker ENV read from it.
Because of this limitation set by Docker, the GitHub Action limits us to setting ARG values at runtime based on the Action's environment variables. This would seem to be enough except that ARG values do not persist after the Docker container is built. By the time that your application is spinning up, when the CMD ["node", "dist/main.js"] step is executing, your container has already been created and all the ARG values will have been discarded.
TL;DR
- We set the GitHub Action's environment variable with
env: TEST_ARG. - The
TEST_ARGis made available to the Dockerfile withdocker_build_args - The Dockerfile reads from its own environment and sets
TEST_ARGwithARG TEST_ARG - The Dockerfile sets
TEST_ENVto the dynamic value ofTEST_ARGwithENV TEST_ENV $TEST_ARG. This value will persist until the container is destroyed. - The Dockerfile completes and any
ARGvariables are discarded.
Deploying to Heroku with GitHub Actions and Docker ENV and ARG Variables
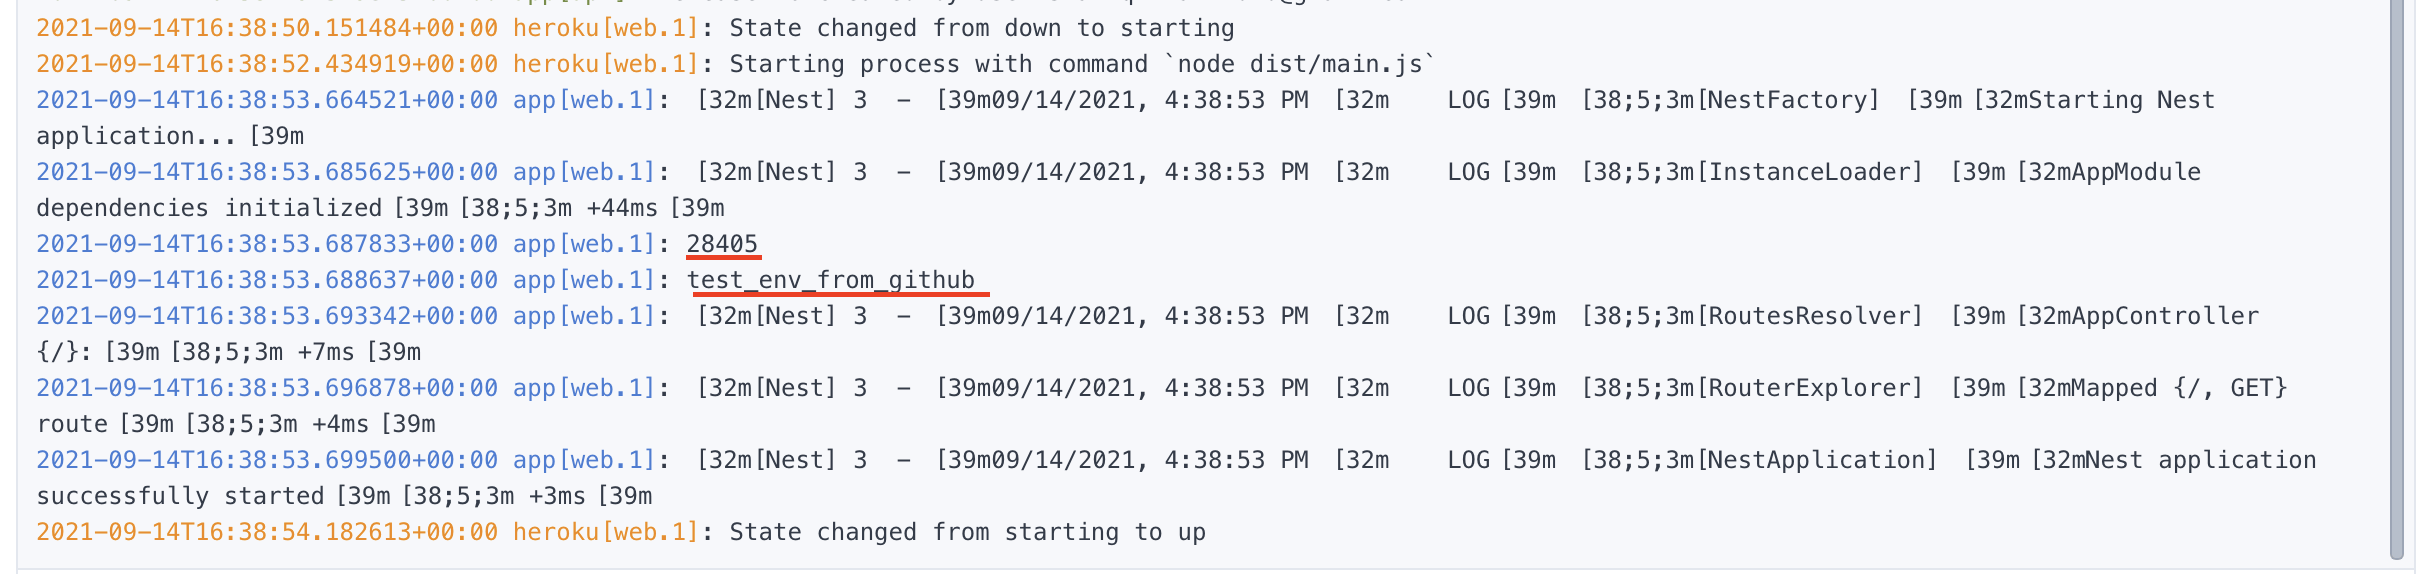
Validating The Environment Variable on Heroku
We're ready to push our application to Heroku, but like all good programmers, we want to see that we have correctly set up our environment variable. Update the /src/main.ts to log out your environment variables PORT and TEST_ENV. Recall that PORT is set by Heroku, so there's nothing for us to do except access it.
import { NestFactory } from '@nestjs/core'import { AppModule } from './app.module'
const PORT = process.env.PORT || 3000const TEST_ENV = process.env.TEST_ENV || null
async function bootstrap() {  const app = await NestFactory.create(AppModule)  console.log(PORT)  console.log(TEST_ENV)  await app.listen(PORT)}
bootstrap()const PORT = process.env.PORT || 3000 simply grabs the PORT variable which should be set by Heroku. If it can't be found, it will default to 3000. This is the default development port, so it's useful for when we develop locally.
const TEST_ENV = process.env.TEST_ENV || null grabs the TEST_ENV which should have been set by our GitHub Action and Dockerfile orchestration.
console.log(PORT) will log out our port.
console.log(TEST_ENV) will log out the value we set.
Trigger the GitHub Action
We should be ready to trigger our GitHub Action and have our NestJS Docker application deploy on Heroku with this next step. All you need to do is add, commit, and push up your changes (namely the GitHub Actions workflow) and your pipeline should automatically trigger!
Navigate to your Heroku logs to see if the expected variables were output.

Conclusion
Congratulations on completing these guides. You should be able to effectively deploy containerized applications with Docker to Heroku using GitHub Actions and pass environment variables to keep your deploys platform agnostic.