- Published on
8 min read
Storing And Accessing Environment Variables in 1Password
- Authors
- Name
- Shariq Hirani
- @shariqhirani


- The Problem with Secret Management for local and test environments
- The Solution to Secret Management with 1Password Secrets Automation
- Setting Up 1Password Secrets Automation
The Problem with Secret Management for local and test environments
Secret management is a hot topic in every Developer and DevOps Engineer's career. Thanks to the help of config servers, HashiCorp Vault, and tightly coupled secret management tools, we have come a long way in securely storing, accessing, and managing secrets. This is all great for a true production environment, but a bit too cumbersome for local and test environments. There is a lot of complexity and added costs to deploy an effective solution for simple builds, but it's still frustrating to have to save test variables.
As of late, I've resorted to storing my environment variables in 1Password. When I need to use them, I copy and
paste them into my .env.local file and am off to the races. This generally works. That is until I move my work to
another computer, forget to add the .env.local to my .gitignore, or haven't accessed that project in a while.
There's also the occasional IDE crash or some other computer issue that seems to get in the way at the most harrowing of times. Beyond these individual problems, it's also cumbersome when I want to share a project with a colleague - they have to generate their own environment variables, or I have to manually share them across Discord or as a 1Password share (assuming they have a 1Password account).
In short, there are quite a few problems with managing environment variables for local projects and a lot of complexity to get them to work seamlessly. Or at least, that was an issue until 1Password Secrets Automation was introduced.
The Solution to Secret Management with 1Password Secrets Automation
1Password's Secrets Automation workflow makes it easy to store, access, manage and share secrets across projects and individuals. The setup is fairly simple but has a few requirements which need to be met. You'll need a 1Password account, a computer or server running Docker or Kubernetes, and the correct SDK. If the SDK doesn't exist, you can use the rest API, but you'll need to do some manual string cleaning and parsing. We'll test with Postman and the Node.js SDK during this tutorial.
Setting Up 1Password Secrets Automation
Here's a quick list of the resources used to create this guide
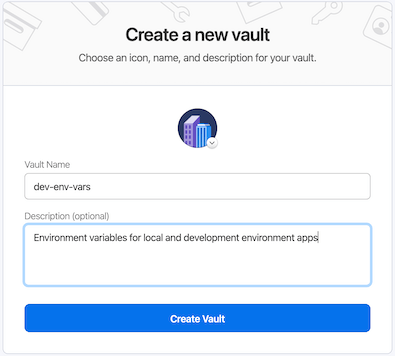
Create A New 1Password Vault
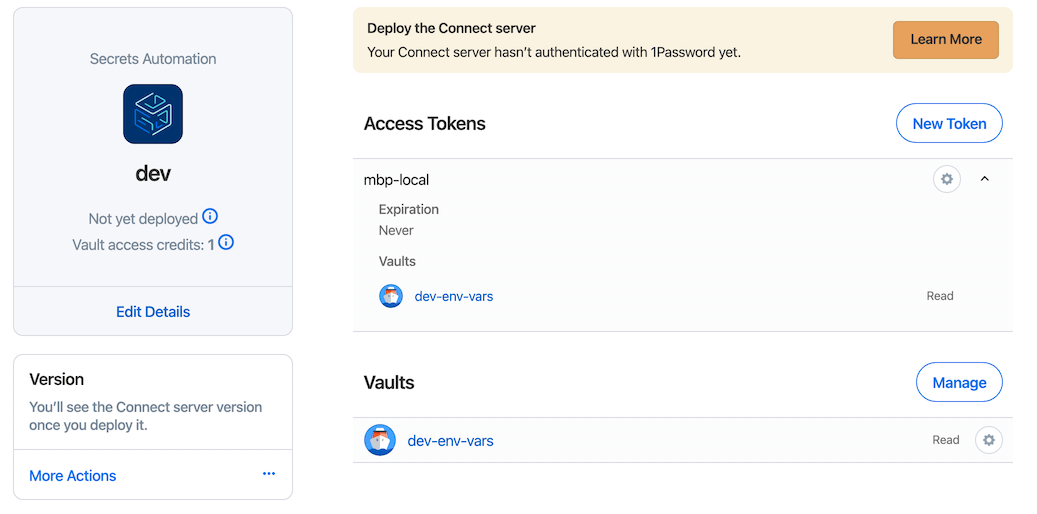
The first thing we need is a new 1Password Vault in which we'll store our environment variables for our projects. Either in the Desktop, Mobile, or online app, go ahead and create this. I named mine dev-env-vars.

Create a 1Password Secrets Automation Integration
Next, we will need to create the environment within 1Password Secrets Automation itself. Navigate to the Secrets Automation workflow page and fill in the appropriate settings.

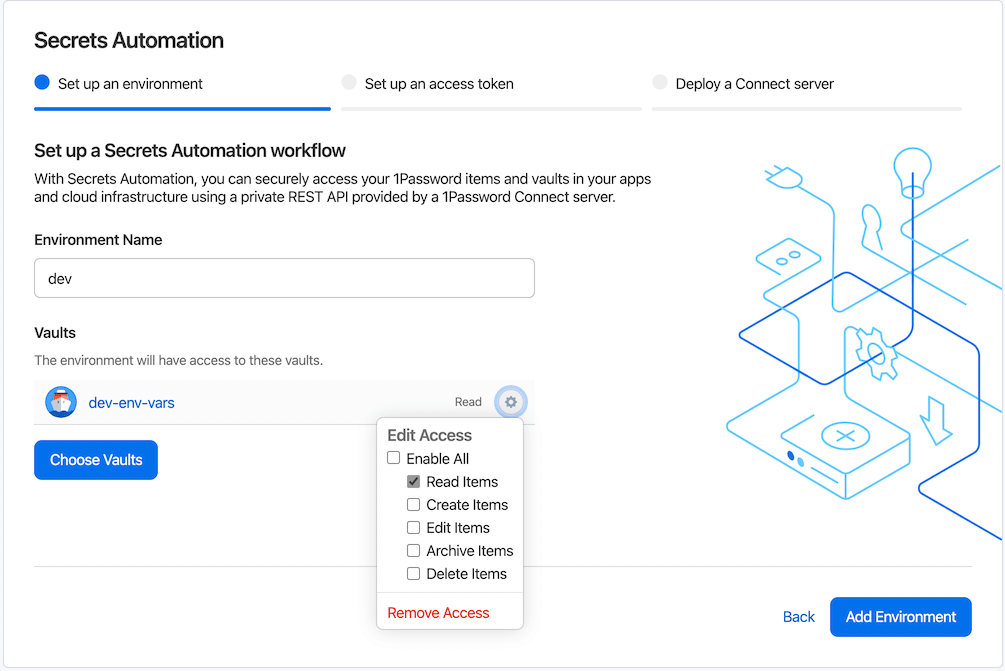
I'm only granting read access at this time. There are many use cases where creating and editing an item can come in handy, but that's not the purpose of this guide, and involves quite a few more security considerations, in my opinion.

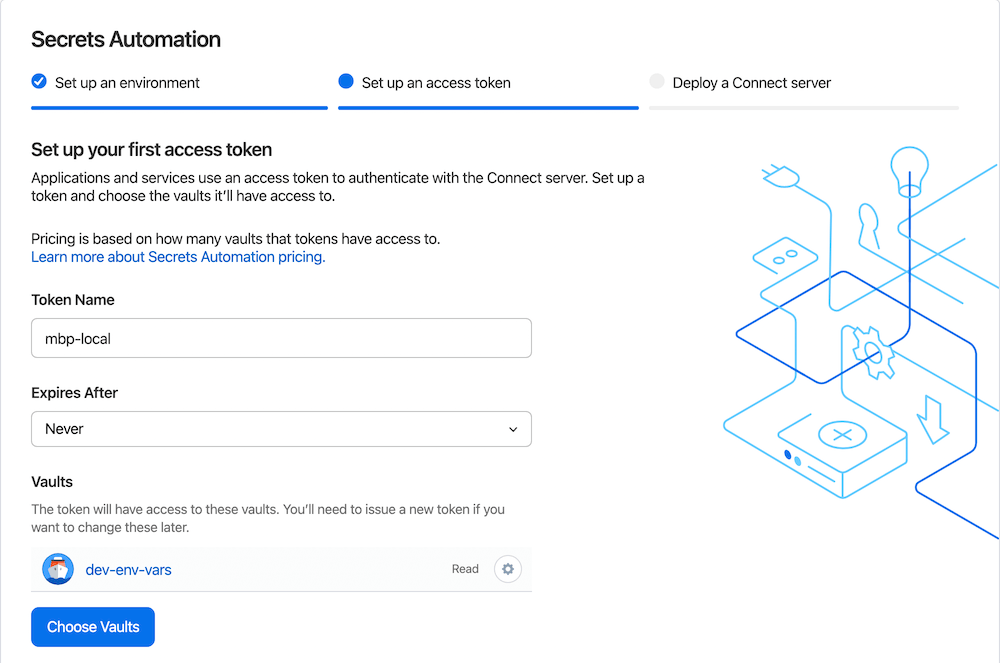
I'm setting this up locally on my MacBook for this tutorial, so I named the token after it. I also gave
it access to the dev-env-vars Vault we set up earlier. Give it an appropriate expiration. This is pretty
important for security purposes.

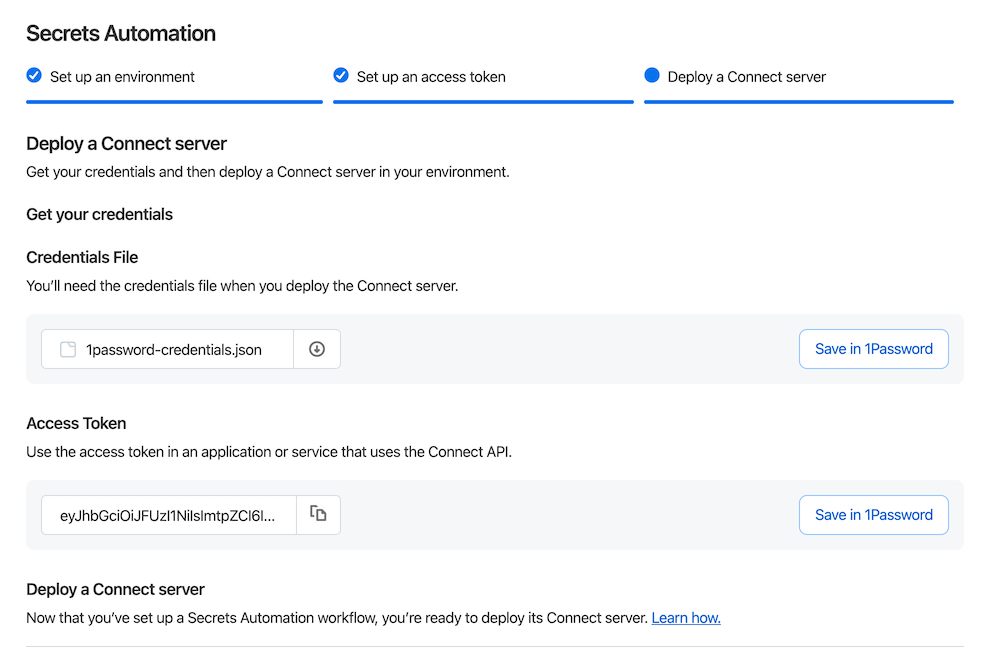
Select Issue Token and download the generated Credentials File. Feel free to save it in 1Password
as well, but be sure to never share it. Also, copy and save the Access Token. You will NOT be able
to see this again so if you lose it you'll need to go through these steps again.
Navigate to your active integrations and select the newly created integration.


Deploy the 1Password Connect Server and Connect API on Docker
Don't let the 1Password documentation fool you, two services that need to be deployed to access the 1Password Secrets Automation server. The first is the Connect Server and the second is the Connect API. We're going to deploy both of these on Docker at the same time with the convenient docker-compose.yaml provided by 1Password. It's pasted below if you prefer that.
version: "3.4"
services:  op-connect-api:    image: 1password/connect-api:latest    ports:      - "8080:8080"    volumes:      - "./1password-credentials.json:/home/opuser/.op/1password-credentials.json"      - "data:/home/opuser/.op/data"  op-connect-sync:    image: 1password/connect-sync:latest    ports:      - "8081:8080"    volumes:      - "./1password-credentials.json:/home/opuser/.op/1password-credentials.json"      - "data:/home/opuser/.op/data"
volumes:  data:
The docker-compose.yaml assumes that it's in the same location as the 1password-credentials.json we downloaded earlier. Either move them to the same folder or update the paths identified in the YAML above.
Navigate to the folder where you've saved both files and run the command to start up the Docker containers. A breakdown of the commands is seen below.
docker-compose up -ddocker-compose up invokes the Docker Engine and starts up the two applications identified within the
docker-compose.yaml.
-d is adding the detached option, so your terminal will not be taken over by the log output of the applications.

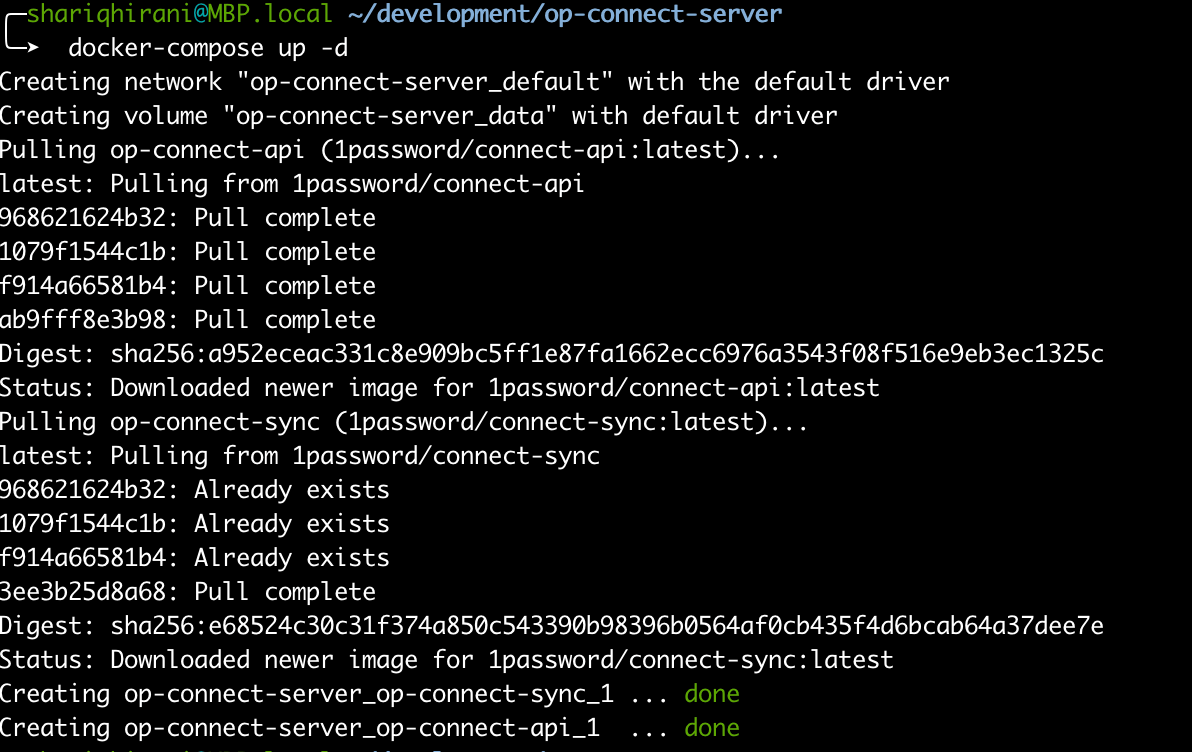
In a few moments, the Docker images will be pulled down and the containers should be started up. Confirm with the following command.
docker ps -adocker ps lists your running containers within the Docker Engine.
-a lists all containers that exists within Docker Engine, running or not.


Validate the 1Password Secrets Automation Connect Server and API with Postman or cURL
We can trust that the Connect Server and API are working as intended, but a good developer should verify. Let that be a life lesson as well. Trust, but verify. We're going to test that we can connect and retrieve data from the server with Postman. I'll also post the cURL commands if you don't want to download another application. Check out the API documentation for other endpoints.
Verify with Postman
Send a GET request to localhost:8080/v1/vaults

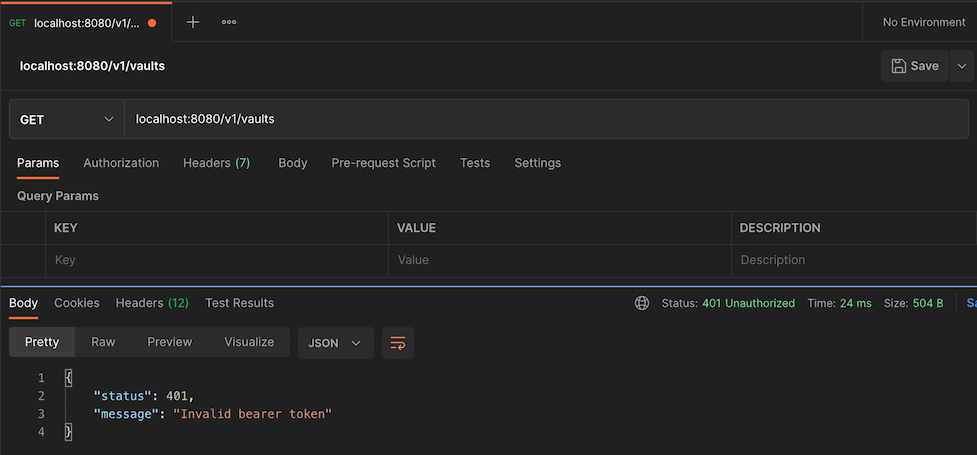
Expect a 404 for now. We'll need to update the request with the Access Token we had copied earlier.

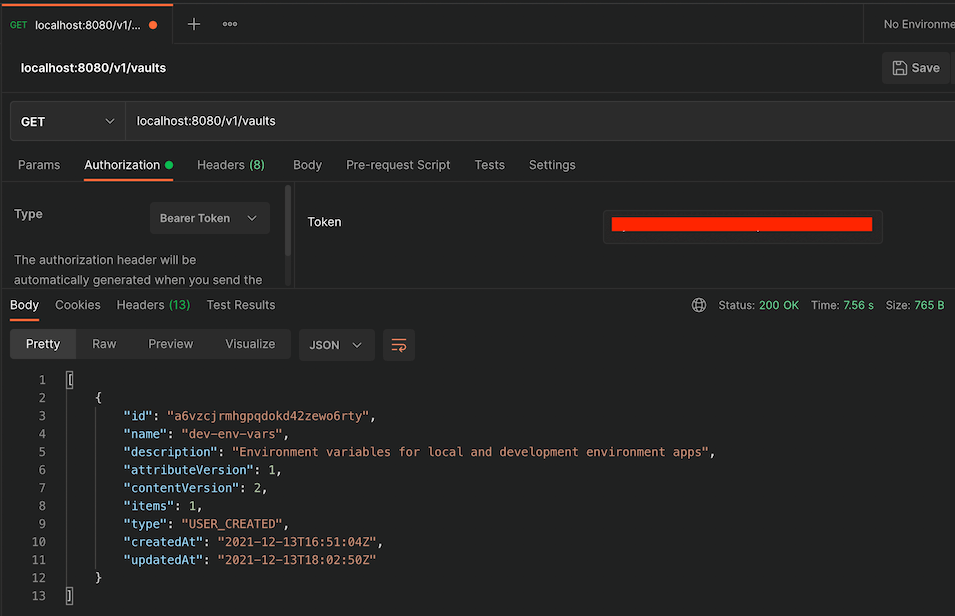
Under the Authorization tab, update the type to Bearer Token and paste in the Access Token. Press Send and after a few seconds, expect a 200 success message and a list of the Vaults which you had authorized!
Grab the id (VAULT_ID) from the response, as we'll need it to access our secrets within that vault. Make another GET request, this time to localhost:8080/v1/vaults/<VAULT_ID>/items, substituting your VAULT_ID.

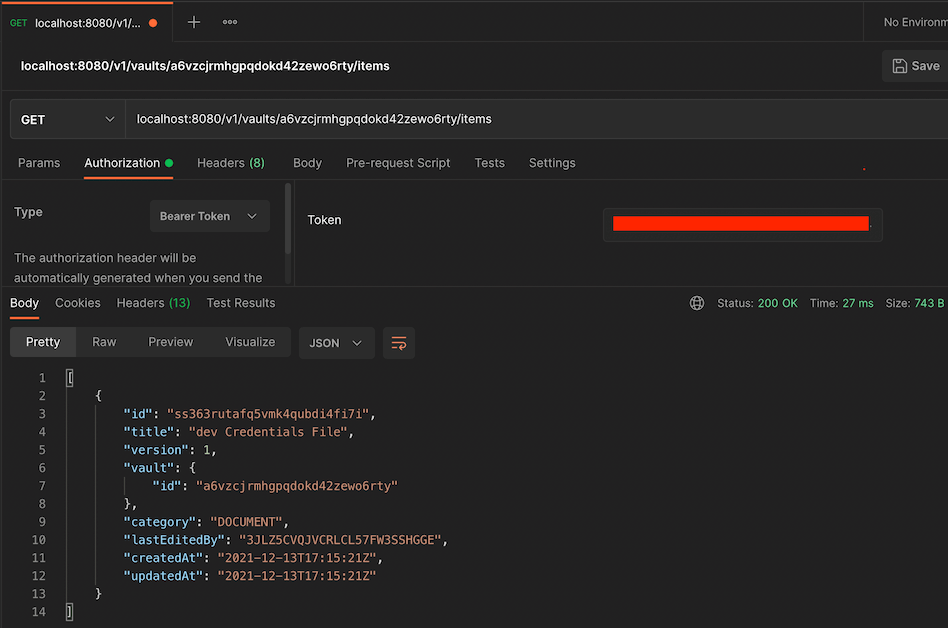
Now grab the id (ITEM_ID) and append it to make another GET to localhost:8080/v1/vaults/<VAULT_ID>/items/<ITEM_ID>, substituting VAULT_ID and ITEM_ID.

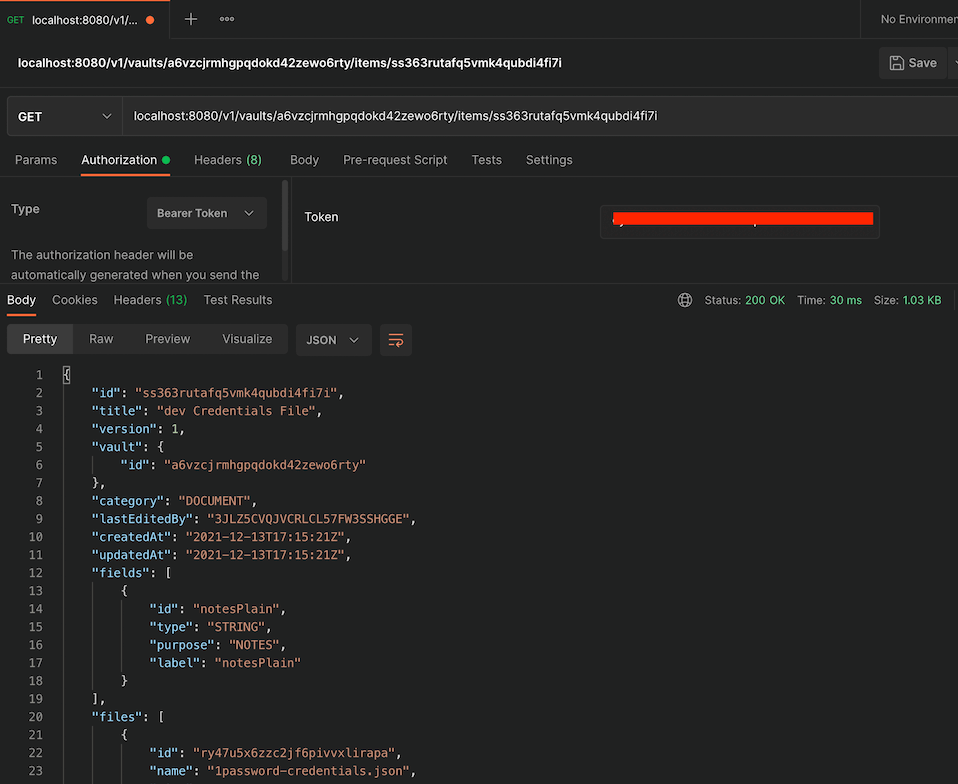
Continue this pattern to get to the file's contents.
Verify with cURL
Send a GET request to localhost:8080/v1/vaults
curl --location --request GET 'localhost:8080/v1/vaults'Expect a 404 for now. We'll need to update the request with the Access Token we had copied earlier.
curl --location --request GET 'localhost:8080/v1/vaults' \--header 'Authorization: Bearer <ACCESS_TOKEN>'Once you update the command and send it, after a few seconds, expect a 200 success message and a list of the Vaults which you had authorized!
Grab the id (VAULT_ID) from the response, as we'll need it to access our secrets within that vault. Make another GET request, this time to localhost:8080/v1/vaults/<VAULT_ID>/items, substituting your VAULT_ID.
curl --location --request GET 'localhost:8080/v1/vaults/<VAULT_ID>/items/' \--header 'Authorization: Bearer <ACCESS_TOKEN>'Now grab the id (ITEM_ID) and append it to make another GET to localhost:8080/v1/vaults/<VAULT_ID>/items/<ITEM_ID>, substituting VAULT_ID and ITEM_ID.
curl --location --request GET 'localhost:8080/v1/vaults/<VAULT_ID>/items/<ITEM_ID>' \--header 'Authorization: Bearer <ACCESS_TOKEN>'Continue this pattern to get to the file's contents.
Next Steps
Look forward to a future blog post on how to start retrieving environment variables from within your applications! In the meantime, take a look at the official SDKs: Go, JavaScript, and Python.